
action
ateneo de zamboanga university
effect
hdr
high dynamic range
pasonanca park
photoshop
tutorial
HDR Effect in Photoshop
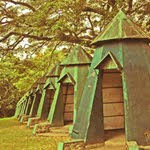 Recently, I discovered this club in deviant art for HDR photographers and digital artists. I was amused when I saw their gallery. The photos were stunning and it looks kinda surreal. It's kinda hard to explain so here's a few quote's from wiki "high dynamic range imaging (HDRI or just HDR) is a set of techniques that allow a greater dynamic range of luminances between light and dark areas of a scene than normal digital imaging techniques or photographic prints. This wider dynamic range allows HDR images to represent more accurately the wide range of intensity levels found in real scenes ranging from direct sunlight to faint starlight." Here are some photos that I tweaked to have this HDR look that I was talking about.

I also made an action for photoshop in case you want to see how your photos would look like with the HDR effect. Click here to download the file. After downloading, open your image in photoshop. Then, go to the actions window (Windows > Action or alt+f9). In the upper right hand corner of the palette is a small arrow (
 or
or  at the bottom of the pallette. Wait for a few seconds and see the results. Here is a sample of what it will look like before and after the action is applied.

Results may vary depending on your photo. It also works best in dark landscapes like the one that I used above. When I used portraits, the results are very vivid so I created the Desaturate action. If you think the colors are too saturated, use this action as many times as you want. If you want to have a retro look, you can use the Retro color action. Here's the result when I applied the action to the last photo above.
 Isn't it cool? I wonder how your photos will look like if you use the actions. Contact me or a post a link of your work. For more photos, check out my multiply site here.
More on HDR:
Magic of HDRI
HDR Photoshop Effect
Wiki: HDR


 Cedrick S. Zabala "CSZ97" is a multimedia artist based in the City of Zamboanga. He graduated with a Bachelor's degree in Information Technology major in Multimedia and Computer Animation. Currently he works at the City Government of Zamboanga under the Mayor's Office as a Public Information Officer, and as a part-time Instructor in Ateneo de Zamboanga University. He is currently taking his Master's Degree in Public Administration in Western Mindanao State University. He lives a life with a passion for the arts, culture, and travel. This blog contains his works and travel journals. Carpe effin' Diem!


Post a Comment